Work with a reliable Philadelphia roofing contractor for repairs, replacements, and inspections that protect your home year-round.
Winter in the northern climates brings an undeniable beauty. A serene silence falls over a neighborhood blanketed in fresh, white snow, and there is a certain charm to the glimmering icicles hanging from the eaves of a house. However, for the seasoned homeowner, those picturesque icicles are not a decoration; they are a warning sign. They are the visible tip of a destructive iceberg known as an ice dam.

An ice dam is exactly what it sounds like: a ridge of solid ice that forms at the edge of a roof and prevents melting snow (water) from draining off the roof. The water that backs up behind the dam can leak into a home, damaging walls, ceilings, insulation, and other areas. It is a silent destroyer that defies gravity, pushing water up under your shingles and into your living room. Understanding why this phenomenon happens is the first step in fortifying your home against thousands of dollars in winter water damage.

The Science Behind the Icicle: Why Dams Form
To prevent ice dams, you have to understand the thermal dynamics of your home. Ice dams are rarely caused by the weather outside; they are caused by the weather inside. Specifically, they are the result of a “hot roof.” In a perfectly designed home, the roof surface should be the same temperature as the outdoor air. When it isn’t, trouble begins.
The process starts when heat from your living space escapes into the attic. This warm air rises, heating the underside of the roof deck and warming the shingles from below. This heat melts the snow sitting on the roof, even when the outside temperature is well below freezing. This meltwater trickles down the roof’s slope, running beneath the blanket of snow. However, when it reaches the roof’s edge (the eaves), it hits a cold spot. Because the eaves overhang the exterior walls, they are not warmed by the attic heat. The water hits this freezing zone and instantly solidifies. Over several days of this melt-freeze cycle, the ice builds up, forming a solid barrier that traps future meltwater.
The Danger of “Ponding” Water
The ice ridge itself isn’t the problem; the pool of water behind it is. Roofs are designed to shed water, not hold it. Standard asphalt shingles are water-shedding, not waterproof. They rely on gravity to move water down and off. When an ice dam blocks the exit, the water pools and rises.
Eventually, this standing water finds the path of least resistance: underneath the shingles. It seeps through nail holes and gaps in the roof sheathing, dripping onto your attic insulation. Wet insulation loses its R-value (its ability to resist heat flow), which accelerates heat loss and causes the ice dam to grow faster. From there, the water migrates to your drywall, leading to stained ceilings, peeling paint, warped floors, and potential mold growth in your wall cavities.
Immediate Defense: Removing the Snow
If you already have an ice dam forming, or if a massive blizzard has just dropped two feet of snow, your best immediate defense is to remove the fuel source. If there is no snow to melt, there is no water to freeze. Using a roof rake—a long-handled tool with a flat aluminum blade—you can safely pull snow off the roof while standing on the ground.
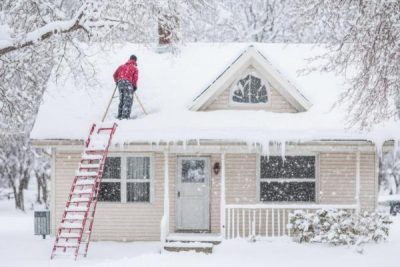
You don’t need to scrape the roof clean (which can damage the shingles); you just need to remove most of the snow from the bottom three to four feet along the roof edge. This keeps the eaves cold and prevents the meltwater from having a source. Never try to chip away existing ice with a hammer, chisel, or axe. You will almost certainly crack your shingles in the process, trading a winter leak for a permanent one. Also, avoid using standard rock salt, which is corrosive to nails and harmful to the plants below. If you must melt ice, use a calcium chloride ice melt filled into a pantyhose leg and laid across the dam to create a channel for water to escape.
The Long-Term Cure: Air Sealing and Insulation
While raking is a good band-aid, the cure for ice dams lies in the attic. You must stop the heat from escaping your living space. This starts with air sealing. Warm air leaks into the attic through gaps around light fixtures, plumbing pipes, chimneys, and attic hatches. Sealing these bypasses with spray foam or caulk stops the “chimney effect” that pumps heat into the attic.
Once the air leaks are plugged, check your insulation levels. If you can see the tops of your floor joists in the attic, you likely don’t have enough. Adding a thick layer of cellulose or fiberglass insulation keeps the heat where it belongs—in your bedrooms and kitchen—and keeps the roof deck cold.
Ventilation: Letting the Roof Breathe
Finally, a roof needs to breathe to stay cold. Proper ventilation ensures that any heat that does leak into the attic is immediately flushed out by cold outside air. This is achieved through a balanced system of intake vents (in the soffits under the eaves) and exhaust vents (at the roof peak).
Protect your home from ice dams with this guide—learn what causes them, how to prevent buildup, and tips to avoid roof and gutter damage.
Ensure your soffit vents are not blocked by insulation. Baffles—plastic or foam chutes—should be installed between the rafters to create a clear channel for air to flow from the soffit up to the ridge. This continuous wash of cold air keeps the roof deck temperature consistent from top to bottom, preventing the uneven melting that creates the dam. By addressing insulation and ventilation, you can hang up your roof rake for good and enjoy the winter snow without worrying about what’s happening underneath it.